

Continuum Shaders 1.20.4 → 1.20
Continuum Shaders 1.20.4 → 1.20 is one of the greatest shaders of all time, available for the latest versions of Minecraft. There is no doubting the fact that Shaders are a significant part of Minecraft itself. You will not achieve a lot without Shaders being downloaded and installed in your world. This is probably one of the reasons why they are proving to be special amongst players in recent years. But, of course, no one can doubt that Minecraft is a unique game. Its concept is quite innovative, endeared to lots of players since coming into being in 2009. However, it is fair enough to say that this game has been criticized repeatedly by most players for its poor graphics and visuals. It is no secret that without improved visuals, you can’t enjoy the game of Minecraft. This is because your world will look very poor and unimpressive. This is where Shader Pack will prove to be very useful and essential. With such tools at your disposal, you will have the unique chance of creating a world that other players can envy. Are you searching for a reliable shader pack? Then Continuum Shaders can meet your needs as it has done for other Minecraft players in the past. The details below will be aiming to show you why this remains one of the best shader packs.
Before delving into details to find out more about Continuum Shaders, you must understand how this Shader pack originated. First of all, it has some connections with SEUS Shaders. Its author, doc modded, got permission from Cody Darr, who happens to be the creator of SEUS. In case you do not understand, it simply means that Continuum shaders are a tool that is existing based on the ideas of SEUS. If you haven’t got enough of what the latter has got to offer, the former will meet all of your needs without compromise. Both tend to have features and additions that are slightly similar, though. The truth about Continuum Shaders is that its additions are pretty dazzling in lots of regards. You will find your world looking unique and beautiful after its installation. For instance, the clouds and shadows are very realistic. You will notice how shadows tend to be moving along the sun in your world. This makes your adventure come alive. What about the lighting effects that it brings? These are extraordinary, and there is no doubt that you will be impressed.
Your world will have its natural colours to make the environment very beautiful. The bottom line about this shaders is that it has been created to improve the game’s visuals beyond its default state. Not taking advantage of its features means your world will still look mediocre, thereby lacking important details that could have contributed towards an immersive gaming experience. Not every shader pack can improve your graphics like this one. The worst part is that some will put lots of pressure on your game’s Graphics Processing Unit (GPU) without contributing much towards changing its visuals. However, the Continuum has proven to be very different since coming into being. Best of all is that it makes your world have some stunning effects.
The first thing you have to know about the Continuum shader pack is that although its ideas are based on SEUS, it is a standalone pack. In other words, you can make use of it without having SEUS installed. It will still work very well as expected. Also, note that Shaders mod will have to be installed before it can be used. Anything short of this means you may not experience its features. Finally, it is imperative to point out that continuum shaders will demand a lot from your PC. This means if you have a low-end PC, it may not work as expected.
Features


Supported Versions 1.21 – 1.20.6 – 1.20.4 – 1.20.2 – 1.20 – 1.19.4 – 1.18.2 – 1.17.1 – 1.16.5 – 1.15.2 – 1.14.4 – 1.13.2 – 1.12.2 – 1.11.2 – 1.10.2 – 1.9.4 – 1.8.9 – 1.7.10
Continuum RT is quite performance intensive and is also very early Alpha; as such, requirements are fairly high, performance may be highly variable, and there will be missing features and bugs.
Minimum:
- CPU: Nearly any Dual core CPU from intel/AMD made in the last 5-7 years
- GPU: Nvidia GeForce GTX 1060 6GB or equivalent / AMD RX 580* or equivalent
- RAM: 4GB
- OS: Windows 7, 64-bit or later (MacOS not supported at this time)
Recommended:
- CPU: Quad-core CPU from Intel/AMD from the last 4-5 years or better
- GPU: Nvidia GeForce GTX 1080 / RTX 2070 or AMD RX 5700* or better
- RAM: 8GB or more
- OS: Windows 10, 64-bit
Software Requirements:
- RT Builds 13 and higher require the latest version of our Focal Engine and all of its dependent mods, 1x shadow quality setting (no lower or higher), and a relatively new graphics driver version.
How to Install Continuum Shaders?
We have compiled helpful installation guides to ensure correct installation of this shaderpack in your Minecraft. Follow these guides for a seamless installation experience.
It is strongly advised to create a backup of your Minecraft map before updating the game to new versions to ensure the safety of your progress.
Locate the Folder
Locate your Minecraft installation folder. The default location for the Minecraft folder varies depending on your operating system:
- Windows: %appdata%.minecraft
- Mac: ~/Library/Application Support/minecraft
- Linux: ~/.minecraft
Make a Copy
Once you’ve found the Minecraft folder, make a copy of it and paste it into a different location, such as an external drive or a backup folder on your computer.
Save and Restore if Necessary
The copied Minecraft folder will serve as your backup. If anything goes wrong during the mod installation process or if you want to revert to the original state, you can replace the modified Minecraft folder with the backup.
Optifine and Forge require Java to be installed on your computer in order to work properly with Minecraft.
Download the Java installer
Visit the official Java website here: On the website, click on the “Download Java” button.
Run the installer
Once the installer is downloaded, locate the file and double-click on it to run it.

- Support Forge / Vanilla
- Shaders Compatibility
- Extra Features
- FPS Boost
- Optimized Textures
 Optifine Installation Guide
 How to install Continuum Shaders with Optifine?
Download Optifine:
Download the appropriate version for your Minecraft.
Install Optifine:
Once the Optifine file is downloaded, run the installer and follow the on-screen instructions to install it

Download Shaders:
Download the shader pack that is compatible with your Minecraft version.
Launch Minecraft with OptiFine
Open the Minecraft launcher and select the newly installed OptiFine profile to launch the game.

Locate the Shaders option
Once in the game, navigate to the “Options” menu, then select “Video Settings,” and click on “Shaders.”

Install Shaders
In the Shaders menu, you’ll find a “shaderpacks” folder button. Copy the downloaded shader pack’s zip file into this folder.

Enable the shader in Minecraft
You should see the installed shader pack listed in the in-game Shaders menu. Select it to enable the shader.


- Support Fabric / Quilt
- Performance Boost
- Shaders Compatibility
 Iris Installation Guide
 How to install Continuum Shaders with Iris & Sodium?
Download Iris:
Download the latest version of the Iris installer.
Install Iris
Locate the downloaded Iris Installer and open it.
Choose installation type:
- Iris Install: Select this option if you don’t plan on using any other mods alongside Iris.
- Fabric Install: Opt for this option if you intend to use Iris with Fabric and other mods. The Iris jar files will be copied to the mods folder within the .minecraft directory.

Launch Minecraft
Launch the Minecraft launcher. Choose the profile you decided to install in the previous step.

Install Shaders
Navigate to Options > Video Settings > Shader Packs within the game.
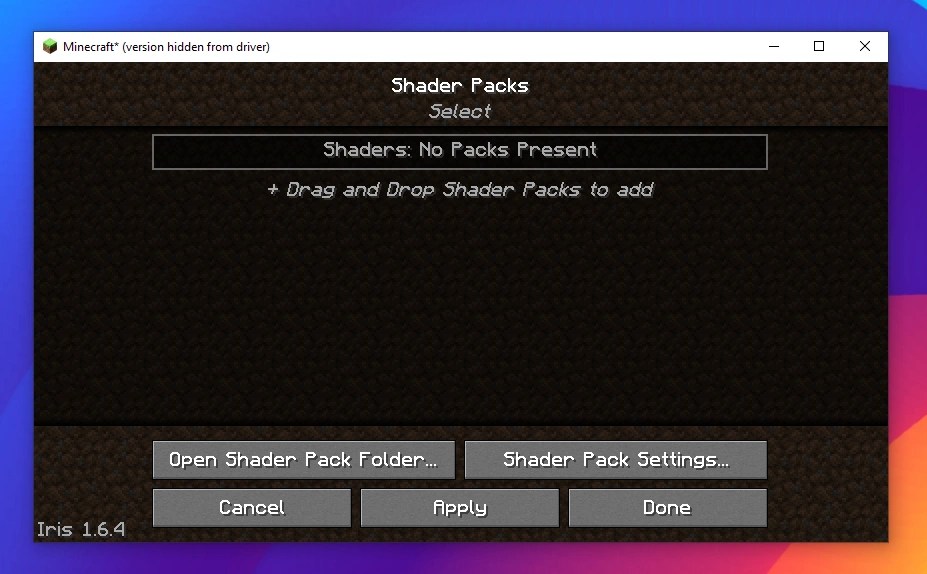
Drag and Drop
You can directly drag and drop the shader zip file into the Minecraft window to install a shader pack.

Continuum Shaders — Download Links
 Files
Files- Some Shaders have not been appropriately updated to 1.20. Still, all have been tested and work correctly in Minecraft 1.20.
- All download links are original and from the creator himself. We never host or edit any files. We only distribute them as a direct link to our users, ensuring security and quality. If you doubt this, don’t forget to read our Terms.
- It is noteworthy that the links may stop working with each new update. Even with all our efforts to keep everything updated, these things can happen; if any link is not working, please let us know.
- Leave feedback below on what you think of this Shader Pack; it helps the authors improve their packs.
Download Links:


