Review
How to install
OPAL Shaders combines a fantasy feel and contrasting colours without compromising the original game’s aesthetic, which resembles the appearance of Minecraft trailers. It lets you experience the visual experience much like the original, yet with a colour palette that is more contrasting and atmospheric effects that are more dynamic and hence lets you have a more immersive experience. Are you a Minecraft fan who wants to give the visuals in your game a boost? Then OPAL Shaders Pack may be the mod you have been expecting.
OPAL Shaders is a shader pack developed by Fenven, which is an adaptation of a well-known shader pack, BSL Shaders, developed by CaptTatsu. The pack aims to provide an ideal mix of fantasy-like worlds and realism. And the pack does this without leaving the vanilla feel of the game.
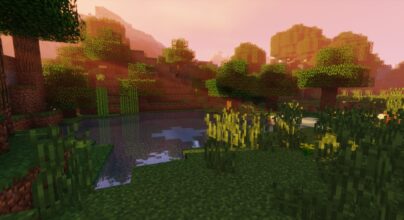
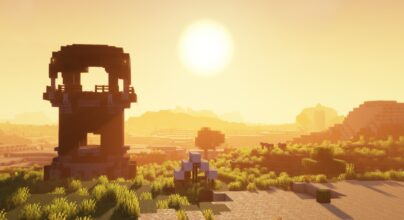
The pack will include realistic water and realistic fog. The pack also enhances the feel of the Nether and End dimensions, making them much creepier. The images at sunset and sunrise are visually pleasing and worth watching.
In terms of performance, the pack offers good performance in mid-end and high-end devices. Since this pack contains high-quality visual effects, low-end devices may struggle to maintain the same visual quality.
Features
Visual Immersion
OPAL Shaders preserve the pixelated look of Minecraft and put realism and fantasy layers on top of it. The default colour and contrast settings are close to the original game spirit, and they offer a better visual depth.
Realistic and Dynamic Visual Effects
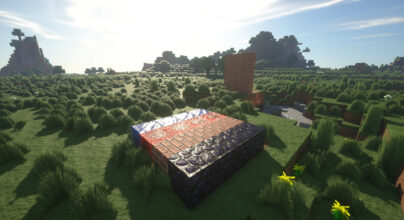
With the shader, dynamic clouds are implemented, changing the sky to appear realistic based on different weather conditions. Seas, rivers and lakes are also more vivid as water enjoys enhanced shading. Cycles day/ night are also enhanced as the representation of the sun and moon is much more beautiful.
Lighting and PBR Effects
Lighting is also well-balanced, creating depth and contrast that gives a better sense of the environment. PBR (Physically Based Rendering) allows making textures and materials highly realistic, especially in combination with PBR-compatible texture packs.
Key features
- Volumetric Fog
- Reflections In Rain
- World Curvature
- Ocean Biomes
- New Ocean Lighting
- Atmospheric Scattering
- Increased View Distance
- Ability to change background color in workbench
- Clouds are no longer see-through from the inside
OPAL Shaders is best suited to mid-range and high-end PCs. Although it provides a stunning visual enhancement, system performance can be significantly reduced on low-end systems due to the graphical enhancements provided by the shader. However, with the hardware capable of running it, the reward is a ravishing Minecraft world that seems like a fantasy movie coming to life.
If you are a creative builder, an adventurer, or just a regular player, OPAL Shaders has a reasonable balance between realism and fantasy that will enhance your Minecraft experience without affecting the nostalgic look of the game. Featuring improved lighting, realistic water, atmospheric effects and much more, this shader pack is a definite must-try in case you want to see Minecraft as you never did before.
Download OPAL Shaders now and enter the realm where creativity meets stunning visuals.
If you’re looking to explore more shader options, check out our personal favourite Bliss Shaders, which offers a peaceful and performance-optimized shading experience, the Sonic Ether’s Unbelievable Shaders (SEUS), which improve the visuals, or SildursVibrant Shaders, features the latest lighting effects.
Gallery


How to Install?
The installation guide has been relocated to the installation tab located at the top of the page.
Quick pollHelp Developers
Bliss Shaders Links
Please note the following information:
- Some Shaders have not been appropriately updated to 26.1. Still, all have been tested and work correctly in Minecraft 26.1.
- All download links are original and from the creator himself. We never host or edit any files. We only distribute them as a direct link to our users, ensuring security and quality. If you doubt this, don’t forget to read our Terms.
- Additionally, browse the best Minecraft Shaders, grouped by category for easier navigation.
We have compiled helpful installation guides to ensure correct installation of this shaderpack in your Minecraft. Follow these guides for a seamless installation experience.
Backup Guide
It is strongly advised to create a backup of your Minecraft map before updating the game to new versions to ensure the safety of your progress.
Locate the Folder
Locate your Minecraft installation folder. The default location for the Minecraft folder varies depending on your operating system:
- Windows: %appdata%.minecraft
- Mac: ~/Library/Application Support/minecraft
- Linux: ~/.minecraft
Make a Copy
Once you’ve found the Minecraft folder, make a copy of it and paste it into a different location, such as an external drive or a backup folder on your computer.
Save and Restore if Necessary
The copied Minecraft folder will serve as your backup. If anything goes wrong during the mod installation process or if you want to revert to the original state, you can replace the modified Minecraft folder with the backup.
Java Installation Guide
Optifine and Forge require Java to be installed on your computer in order to work properly with Minecraft.
Download the Java installer
Visit the official Java website here: On the website, click on the “Download Java” button.
Run the installer
Once the installer is downloaded, locate the file and double-click on it to run it.

OptiFine Loader
Required 1.8.8+Step by Step
Download Optifine:
Download the appropriate version for your Minecraft.
Install Optifine
Once the Optifine file is downloaded, run the installer and follow the on-screen instructions to install it

Download Shaders:
Download the Shader package that is compatible with your Minecraft version.
Launch Minecraft with OptiFine
Open the Minecraft launcher and select the newly installed OptiFine profile to launch the game.

Locate the Shaders option
Once in the game, navigate to the “Options” menu, then select “Video Settings,” and click on “Shaders.”

Install Shaders
In the Shaders menu, you’ll find a “shaderpacks” folder button. Copy the downloaded shader pack’s zip file into this folder.

Enable the shader in Minecraft
You should see the installed shader pack listed in the in-game Shaders menu. Select it to enable the shader.

Iris Loader
Required 1.16.2+Step by Step
Download Iris:
Download the latest version of the Iris installer.
Install Iris
Locate the downloaded Iris Installer and open it.
Choose installation type:
- Iris Install: Select this option if you don’t plan on using any other mods alongside Iris.
- Fabric Install: Opt for this option if you intend to use Iris with Fabric and other mods. The Iris jar files will be copied to the mods folder within the .minecraft directory.

Download Shader:
Download the Shader package that is compatible with your Minecraft version.
Launch Minecraft
Launch the Minecraft launcher. Choose the profile you decided to install in the previous step.

Install Shaders
Navigate to Options > Video Settings > Shader Packs within the game.

Drag and Drop
You can directly drag and drop the shaders zip file into the Minecraft window to install a shader pack.

You Might Also Like
Best
BSL Shaders is one of the most popular shaders available for Minecraft
Up!
The Complementary Reimagined Shaders can improve the Minecraft Java edition.

Best
Sildur’s Vibrant Shaders is one of the most renowned Minecraft shader packs.
Best
Complementary Shaders is one of the most popular Minecraft shader packs.
Outdated
SEUS Shaders, simply the favorite Shader of the Minecraft community.